
A pool is more than just a place for you to relax, swim, and enjoy the water. It’s also a key addition to your home that requires periodic repairs and routine maintenance. If you aren’t careful, the amount of time and money you put into your pool can quickly add up.
Thankfully, there’s a simple way to reduce your maintenance costs, save time, and keep your pool open all year—installing a pool enclosure.
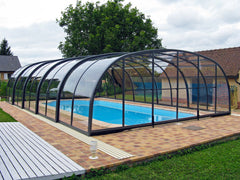
We offer pool equipment enclosure kits in a range of designs and materials. All of these pool enclosures serve the following key functions:
- Harnessing the power of solar energy to reduce heating costs.
- Creating a visual barrier for additional privacy.
- Securing your pool area with locking doors.
- Keeping leaves, debris, and sticks out of the pool.
- Protecting the surrounding area from rain and hail.
- Adding more functional space to your yard.
- Reducing your exposure to UV light.
These magnificent structures may seem daunting to install, but they are actually much easier to install than you might think.
Many homeowners purchase a pool enclosure online in order to save on the purchase price. Installation is typically handled by a local contractor. We also offer the option of using a dedicated installation team that works with the manufacturer.
You can always call our store phone number of send us an email through our contact form if you have questions about the installation process.
To give you an idea of what to expect during the installation process, this article walks you through the specific steps. We also have included a video below which highlights the pool enclosure installation process.
The Installation Process
For such a large structure, the installation process for pool enclosures is actually relatively simple. While preparing to begin, installers will lay out their tools and ensure that all components of the pool enclosure are in good condition.
Assemble the track
The first step is to assess the pool area and assemble the rails that will serve as the bottom of the enclosure.
Internal connecting pieces must be riveted in place to slide the rails together and secure them. From there, installers will analyze how level the ground is and add in shims accordingly before screwing the rails into the concrete.
Add enclosure panels, pins, and locks
Once the tracks are installed, the first pieces of the enclosure are added by sliding each segment along the rails. Since these pool enclosures are retractable, multiple segments can be pushed together to conserve space and leave enough room to install more track.
While all the enclosure segments are still pushed to the far side of the track, the team will install the pins that allow you to lock the panels. This ensures that the locks are in the right configuration to maximize the usable space in your pool with the enclosure retracted.
Install faces, plates, and doors
At this stage, the installers will insert rubber around the end faces of the enclosure to prevent leaks and then screw the faces onto the rest of the frame. Once the faces are attached, the team will install any remaining plugs and seals to protect against the weather.
This is when the enclosure looks more complete since it has all the panels in place and appears to be closed in. From here, the installation professionals will add plates along the track to keep your pool enclosure from overextending.
The door to the pool enclosure is designed to hang along a sliding rail. This is a short step that involves securing the door to the track and confirming that it moves easily.
Add harassments
Harassments are a type of locking pin that secure your pool enclosure against wind and inclement weather. The bases are inserted into the concrete to accommodate the corresponding pins on the segments of the enclosure.
Harassments can be placed inside the enclosure or on the outside depending on your personal preferences.
Finish the track
The installers will now insert small rubber sleeves into the rails and add a rivet through the track to keep the lengths from separating.
Once this is complete, the final step is to attach the decorative end pieces to give the track a smooth appearance.
Cleaning and Wrapping up
Once the actual installation is finished, the team will clean the area and pack up any trash. They will also review any important information you may need to know or answer any of your questions at this time.
- For more information, visit our full line of modern pool equipment enclosures.